
Atomic 原子操作类
1. Atomic 原子操作类介绍
在并发编程中很容易出现线程安全问题,最经典的例子就是多线程同时执行 i++ 操作,极易导致最终计算的值不准确。针对这种问题,最传统的做法是使用 synchronized 加锁来控制同步。但是由于 synchronized 采用的是悲观锁策略,导致其在并发竞争激烈时并不是一种高效的解决方案。
为了解决这个问题,Java 在 java.util.concurrent.atomic(简称 J.U.C 的 atomic 包)下提供了一系列操作简单、性能高效且能保证线程安全的原子类。这些类均采用乐观锁(CAS)策略来原子更新数据,广泛覆盖了基本类型、数组、引用类型以及对象字段的更新。
java.util.concurrent.atomic 包里提供的核心类分为以下几大类:
- 基本类型:
AtomicInteger、AtomicLong、AtomicBoolean - 引用类型:
AtomicReference、AtomicStampedReference、AtomicMarkableReference - 数组类型:
AtomicIntegerArray、AtomicLongArray、AtomicReferenceArray - 对象属性原子修改器:
AtomicIntegerFieldUpdater、AtomicLongFieldUpdater、AtomicReferenceFieldUpdater - 原子类型累加器(JDK 1.8 新增):
DoubleAccumulator、DoubleAdder、LongAccumulator、LongAdder、Striped64
2. 原子更新基本类型
以 AtomicInteger 为例,总结其常用的方法:
// 以原子的方式将实例中的原值加1,返回的是自增前的旧值
public final int getAndIncrement() {
    return U.getAndAddInt(this, VALUE, 1);
}

// 将实例中的值更新为新值,并返回旧值
public final int getAndSet(int newValue) {
    return U.getAndSetInt(this, VALUE, newValue);
}

// 以原子的方式将实例中的原值进行加1操作,并返回最终相加后的结果
public final int incrementAndGet() {
    return U.getAndAddInt(this, VALUE, 1) + 1;
}

// 以原子方式将输入的数值与实例原本的值相加,并返回最后的结果
public final int addAndGet(int delta) {
    return U.getAndAddInt(this, VALUE, delta) + delta;
}
测试示例:
import java.util.concurrent.atomic.AtomicInteger;

public class AtomicIntegerTest {
    static AtomicInteger sum = new AtomicInteger(0);
    public static void main(String[] args) {
        for (int i = 0; i < 10; i++) {
            Thread thread = new Thread(() -> {
                for (int j = 0; j < 10000; j++) {
                    // 原子自增底层使用 CAS 保证线程安全
                    sum.incrementAndGet();
                }
            });
            thread.start();
        }
        try {
            // 等待所有线程执行完毕
            Thread.sleep(3000);
        } catch (InterruptedException e) {
            e.printStackTrace();
        }
        // 预期输出:100000
        System.out.println(sum.get());
    }
}
incrementAndGet() 方法通过 CAS 自增实现,如果 CAS 失败,它会进入死循环(自旋),直到成功将数值加1为止。
@IntrinsicCandidate
public final int getAndAddInt(Object o, long offset, int delta) {
    int v;
    do {
        v = getIntVolatile(o, offset);
    } while (!weakCompareAndSetInt(o, offset, v, v + delta));
    return v;
}
但是这种“CAS 失败就不断自旋”的操作,在有些场景下会成为隐患(见下文 LongAdder 详解)。
3. 原子更新数组类型
以 AtomicIntegerArray 为例,常用的方法如下:
// 以原子更新的方式将数组中索引为i的元素与输入值相加
public final int addAndGet(int i, int delta) {
    return (int)AA.getAndAdd(array, i, delta) + delta;
}

// 以原子更新的方式将数组中索引为i的元素自增加1
public final int getAndIncrement(int i) {
    return (int)AA.getAndAdd(array, i, 1);
}

// 将数组中索引为i的位置的元素进行比较并更新
public final boolean compareAndSet(int i, int expectedValue, int newValue) {
    return AA.compareAndSet(array, i, expectedValue, newValue);
}
测试示例:
import java.util.concurrent.atomic.AtomicIntegerArray;

public class AtomicIntegerArrayTest {
    static int[] value = new int[]{1, 2, 3, 4, 5};
    static AtomicIntegerArray atomicIntegerArray = new AtomicIntegerArray(value);

    public static void main(String[] args) throws InterruptedException {
        // 设置索引0的元素为100
        atomicIntegerArray.set(0, 100);
        System.out.println(atomicIntegerArray.get(0));

        // 以原子更新的方式将数组中索引为1的元素与输入值5相加
        atomicIntegerArray.getAndAdd(1, 5);
        System.out.println(atomicIntegerArray);
    }
}
4. 原子更新引用类型
AtomicReference 的作用是对普通的 Java 对象进行封装,从而保证在多线程下修改该对象引用时的线程安全性。
import lombok.AllArgsConstructor;
import lombok.Data;
import lombok.NoArgsConstructor;

import java.util.concurrent.atomic.AtomicReference;

public class AtomicReferenceTest {
    public static void main(String[] args) {
        User user1 = new User("张三", 23);
        User user2 = new User("李四", 25);
        User user3 = new User("王五", 20);

        // 初始化引用指向 user1
        AtomicReference<User> atomicReference = new AtomicReference<>();
        atomicReference.set(user1);

        // 尝试把 user2 赋给 atomicReference
        atomicReference.compareAndSet(user1, user2);
        System.out.println(atomicReference.get());

        // 尝试把 user3 赋给 atomicReference(注意此时期望值依然写的是user1,应当会失败)
        atomicReference.compareAndSet(user1, user3);
        System.out.println(atomicReference.get());
    }

    @Data
    @NoArgsConstructor
    @AllArgsConstructor
    static class User {
        private String name;
        private Integer age;
    }
}
5. 对象属性原子修改器
AtomicIntegerFieldUpdater 可以线程安全地去更新某个对象实例中指定的整型变量。
import java.util.concurrent.atomic.AtomicInteger;
import java.util.concurrent.atomic.AtomicIntegerFieldUpdater;

public class AtomicIntegerFieldUpdaterTest {
    public static class Candidate {
        // 必须由volatile修饰
        volatile int score = 0;
        AtomicInteger score2 = new AtomicInteger();
    }

    // 构建基于 Candidate 类 "score" 属性的更新器
    public static final AtomicIntegerFieldUpdater<Candidate> scoreUpdater =
            AtomicIntegerFieldUpdater.newUpdater(Candidate.class, "score");

    public static AtomicInteger realScore = new AtomicInteger(0);

    public static void main(String[] args) throws InterruptedException {
        final Candidate candidate = new Candidate();
        Thread[] t = new Thread[10000];

        for (int i = 0; i < 10000; i++) {
            t[i] = new Thread(() -> {
                if (Math.random() > 0.4) {
                    candidate.score2.incrementAndGet();
                    scoreUpdater.incrementAndGet(candidate);
                    realScore.incrementAndGet();
                }
            });
            t[i].start();
        }
        for (int i = 0; i < 10000; i++) {
            t[i].join();
        }

        System.out.println("AtomicIntegerFieldUpdater Score=" + candidate.score);
        System.out.println("AtomicInteger Score=" + candidate.score2.get());
        System.out.println("realScore=" + realScore.get());
    }
}
对于 AtomicIntegerFieldUpdater 的使用,框架做了一些严格的限制和约束:
- 字段必须是 volatile 类型的,以保证在线程之间共享变量时立即可见(如:
volatile int value = 3)。 - 调用者和目标字段的可见性必须匹配:字段的修饰符(
public/protected/default/private)与调用者所处位置的关系必须一致。即如果调用者无法直接通过代码访问该字段,那么反射原子操作也会失败。 - 只能是实例变量,不能是类变量(即不能加
static关键字)。 - 不能是 final 变量,因为
final意味着不可修改,且语义与volatile存在冲突,两者本身也不能共存。 AtomicIntegerFieldUpdater和AtomicLongFieldUpdater只能修改原生int或long类型的字段,不能修改包装类(Integer/Long)。如果要修改包装类,需要使用AtomicReferenceFieldUpdater。
6. LongAdder / DoubleAdder 详解
传统的 AtomicLong 是利用底层的 CAS 操作来保障并发安全性的,它使用死循环配合 CAS,在并发量较低的环境下,线程冲突的概率较小,自旋的次数并不会很多,性能极高。
然而,在高并发环境下,当 N 个线程同时争抢这唯一的一个变量(热点数据)时,会出现大量 CAS 失败并不断重试(自旋)的情况。此时 CPU 算力被大量空耗在自旋上,AtomicLong 会面临严重的性能瓶颈。
这正是 JDK 1.8 引入 LongAdder 的初衷——解决高并发环境下 AtomicInteger 和 AtomicLong 的自旋性能瓶颈。
6.1 性能测试对比
public class LongAdderTest {
    public static void main(String[] args) {
        testAtomicLongVSLongAdder(10, 10000);
        System.out.println("==================");
        testAtomicLongVSLongAdder(10, 200000);
        System.out.println("==================");
        testAtomicLongVSLongAdder(100, 200000);
    }

    static void testAtomicLongVSLongAdder(final int threadCount, final int times) {
        try {
            long start = System.currentTimeMillis();
            testLongAdder(threadCount, times);
            long end = System.currentTimeMillis() - start;
            System.out.println("条件>>>>>>线程数:" + threadCount + ", 单线程操作计数" + times);
            System.out.println("结果>>>>>>LongAdder方式增加计数" + (threadCount * times) + "次,共计耗时:" + end);

            long start2 = System.currentTimeMillis();
            testAtomicLong(threadCount, times);
            long end2 = System.currentTimeMillis() - start2;
            System.out.println("条件>>>>>>线程数:" + threadCount + ", 单线程操作计数" + times);
            System.out.println("结果>>>>>>AtomicLong方式增加计数" + (threadCount * times) + "次,共计耗时:" + end2);
        } catch (InterruptedException e) {
            e.printStackTrace();
        }
    }

    static void testAtomicLong(final int threadCount, final int times) throws InterruptedException {
        CountDownLatch countDownLatch = new CountDownLatch(threadCount);
        AtomicLong atomicLong = new AtomicLong();
        for (int i = 0; i < threadCount; i++) {
            new Thread(() -> {
                for (int j = 0; j < times; j++) {
                    atomicLong.incrementAndGet();
                }
                countDownLatch.countDown();
            }, "my-thread" + i).start();
        }
        countDownLatch.await();
    }

    static void testLongAdder(final int threadCount, final int times) throws InterruptedException {
        CountDownLatch countDownLatch = new CountDownLatch(threadCount);
        LongAdder longAdder = new LongAdder();
        for (int i = 0; i < threadCount; i++) {
            new Thread(() -> {
                for (int j = 0; j < times; j++) {
                    longAdder.add(1);
                }
                countDownLatch.countDown();
            }, "my-thread" + i).start();
        }
        countDownLatch.await();
    }
}
运行结果:
条件>>>>>>线程数:10, 单线程操作计数10000
结果>>>>>>LongAdder方式增加计数100000次,共计耗时:12
条件>>>>>>线程数:10, 单线程操作计数10000
结果>>>>>>AtomicLong方式增加计数100000次,共计耗时:8
==================
条件>>>>>>线程数:10, 单线程操作计数200000
结果>>>>>>LongAdder方式增加计数2000000次,共计耗时:52
条件>>>>>>线程数:10, 单线程操作计数200000
结果>>>>>>AtomicLong方式增加计数2000000次,共计耗时:113
==================
条件>>>>>>线程数:100, 单线程操作计数200000
结果>>>>>>LongAdder方式增加计数20000000次,共计耗时:34
条件>>>>>>线程数:100, 单线程操作计数200000
结果>>>>>>AtomicLong方式增加计数20000000次,共计耗时:1246测试表明,线程数越多,每个线程的并发操作量越大,LongAdder 的性能优势就越明显。在低并发或普通业务场景下,AtomicLong 已经足够使用。如果系统存在超高并发,且呈现明显的“写多读少”特性,那么使用 LongAdder 才是更明智的选择。
6.2 LongAdder 原理
在 AtomicLong 中,所有竞争都集中在单一的 value 变量上,也就是 N 个线程争抢一个热点。
LongAdder 的核心思路是空间换时间(分散热点)。它将单一的 value 值打散到一个 Cell[] 数组中,不同的线程根据内部哈希值会被分配到数组的不同“槽(Cell)”中进行操作。这样一来,原本高度聚集的冲突被分散开了。在需要获取总数值时,只需将各个槽中的变量值以及基础值累加并返回即可。
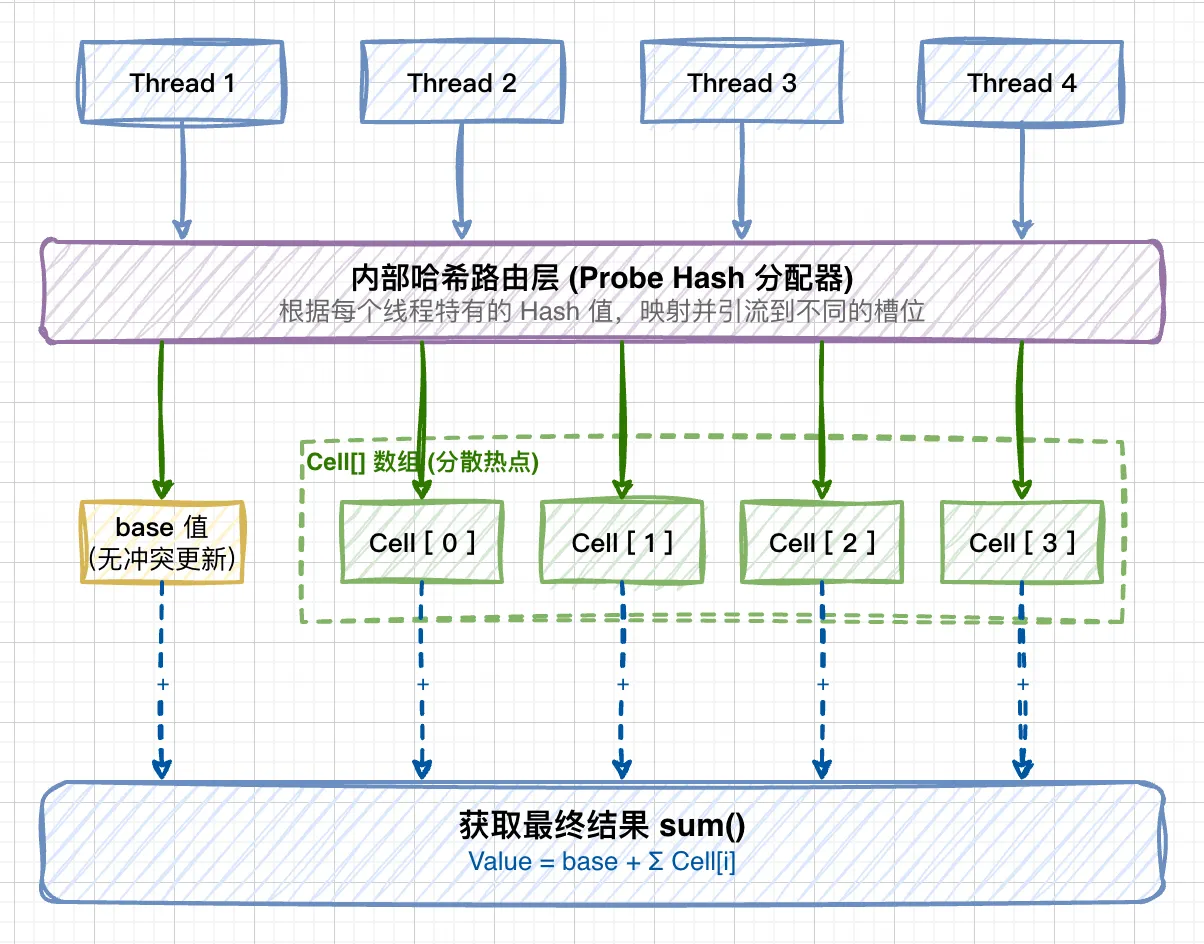
LongAdder 的内部结构:
LongAdder 继承自 Striped64,内部维护了一个 base 变量和一个 Cell[] 数组:
- base 变量:当没有发生线程竞争时,直接将数据累加到该基础变量上;或者在
Cell[]初始化期间起到兜底作用。 - Cell[] 数组:一旦检测到竞争,后续的操作就会定位到各线程自己的槽
Cell[i]中进行累加。
/** CPU 核数,用来决定槽数组大小的上限 */
static final int NCPU = Runtime.getRuntime().availableProcessors();

/** 数组槽,大小总是 2 的次幂 */
transient volatile Cell[] cells;

/** * 基数(base),在两种情况下会使用:
 * 1. 没有并发竞争时,直接用 base 累加
 * 2. 只有唯一的线程能在初始化 cells 数组时获得锁,其他竞争失败的线程会将数值累加到 base 上兜底
 */
transient volatile long base;

/** 锁标记位(通过 CAS 加锁),在扩容或创建 Cells 时使用 */
transient volatile int cellsBusy;
它定义了一个内部静态类 Cell(即我们所说的“槽”),每个 Cell 对象封装着自己的 value,并提供了通过 Unsafe 进行 CAS 修改自身值的方法。
6.3 LongAdder#add 方法逻辑
LongAdder#add 方法的处理流程大致如下:
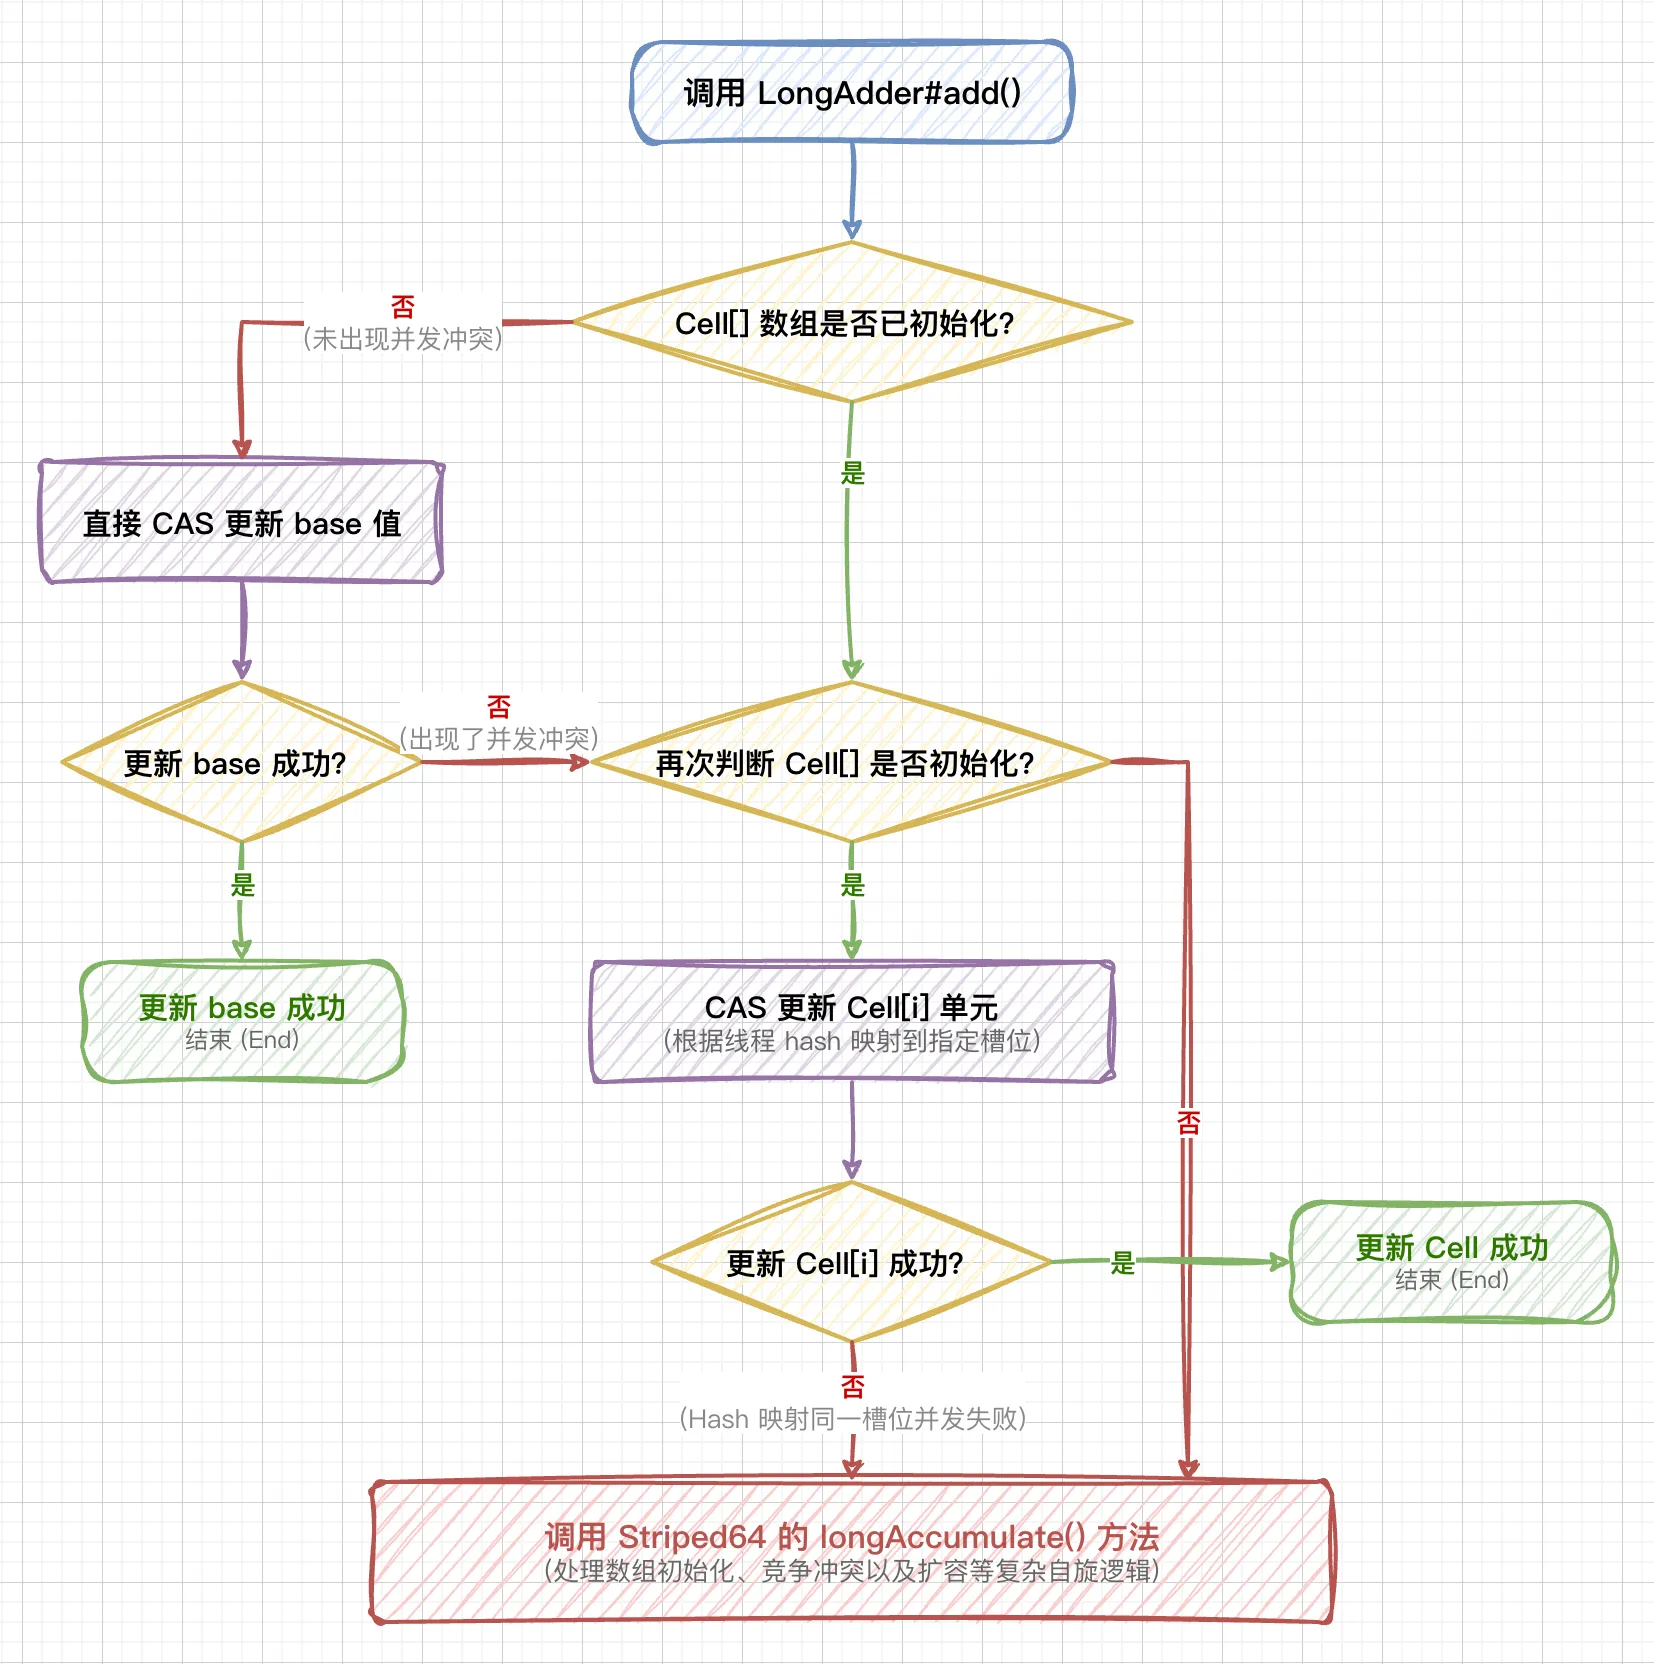
只有在系统运行以来从未出现过并发冲突时,才会始终在 base 变量上执行累加操作。只要出现过一次并发冲突,后续大多数写入操作都会直接针对 Cell[] 数组中的各个单元进行。
如果 Cell[] 数组还未初始化,系统会进入核心的 longAccumulate 方法去初始化它;如果 Cell[] 已经初始化,但在具体槽位依然发生冲突操作失败,同样会调用父类的 longAccumulate,此时可能会触发 Cell[] 数组的扩容机制。
这就是 LongAdder 设计的精妙之处:尽可能减少热点冲突,不到万不得已,尽量将高开销的 CAS 操作延迟甚至分散。
6.4 Striped64#longAccumulate 方法
整个 Striped64#longAccumulate (处理初始化、槽冲突及扩容逻辑)的工作流程如下图所示:

6.5 LongAdder#sum 方法
当我们需要获取最终总数时,会调用 sum() 方法:
/**
 * 返回当前的累加和。
 * 注意:在缺乏全局锁的高并发环境下,你很难得到程序运行中某一瞬间绝对准确的“快照值”。
 * 该方法的返回值只能是一个“近似准确”的值。如果在计算过程中,其他线程仍在并发累加数据,
 * 调用的时刻与最终返回的时刻并非同一时间点。
 */
public long sum() {
    Cell[] cs = cells;
    long sum = base;
    if (cs != null) {
        for (Cell c : cs)
            if (c != null)
                sum += c.value;
    }
    return sum;
}
由于计算总和时并未对 Cell[] 数组或整个结构加排他锁,因此在遍历累加的过程中,可能随时会有其他线程正在对某个 Cell 中的值进行修改,甚至可能对数组进行了扩容。由此可知,sum() 返回的值并非一个高度精确的原子性快照,这也是为了追求极高写入性能所做出的合理妥协。